Wild Willow Hollow

Wild Willow Hollow
Showing posts with label Hive Parts. Show all posts

Sunday, April 17, 2016

Finishing Up

Well after a 6 week break from working in the shop because if a serious accident, I've finally finished building the remaining parts we'll need to spit the colony this spring. I finished the bottom boards, built two more inner covers for feeding, two Queen excluders, two bee escapes, and one more outer comer. All set to split the girls when the time is right.

Bee Escape, Queen excluder, and inner covers.

IPM bottom boards.

Outer cover, the metal cover has been added.

Sunday, November 15, 2015

Working On Next Year

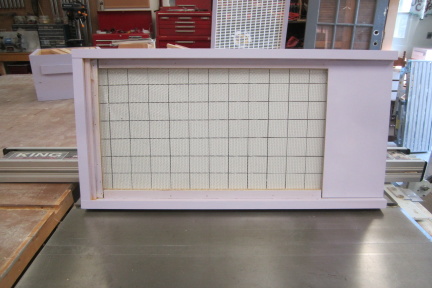
I've built another three medium supers with foundation filled frames for next spring when we'll hopefully split the hive, and maybe into three hives, so I'll be busy over the winter building more hive parts. This new base is a little different than the others, that the front is sloped away to keep water off the deck, which can be a problem for the girls. As well the bottom is screened for ventilation in the summer, and I can put in the bottom board in the winter. I constructed the bottom board so it can be reversible, one side with poly to protect the wood and the other has a grid on it for mite counting in the fall.

With the weather starting to remain about 5° C during the day we thought it's time to put on the winter wrap, and once we started the last pail of sugar syrup was not fully drawn down, this is an indication they have filled all the remaining cells with food and are ready for winter. The cut outs are positioned over vent holes in each super and well back from the top vent, this will help reduce carbon dioxide build up which can be dangerous for a colony over the winter. The inside cover has three layers of two sided thermal bubble wrap to keep the heat in, and with 48 mil rubber membrane covering the hole hive it should be dry. We'll be keeping an eye on them throughout the winter, after all it's our first colony.

New hive with stand ready for next year.

A new design base and bottom board.

Mite inspection grid showing.

Winter wrap on and ready.

Coming out the top vent, very good.

Entrance accessible with wire mesh to help keep out shrews. 

Thursday, September 10, 2015

Getting Ready For Spring

I thought I'd get a head start on making more hive bodies (supers) and frames, so next year when it comes time to split the hive we'll have the parts to start another colony. I still have to make the bottom board, inner and outer covers, along with a stand. I still have time, but for now I made 20 frames and 3 medium supers, we still have 4 frames from before so now we can fill the three supers. Once everything was cut I just used the assembly jig for the frames, add a little glue and nails and then I put in the new permanent foundations. The supers were easy to construct, I applied a primer/sealer coat and then three coats of exterior grade paint, on the outside only.

Supers are done, frames next.

Add a little paint.


Frames glued and nailed together.
Foundations are in and we're ready to go.

Sunday, August 30, 2015

IPM

IPM - Integrated Pest Management, trying to keep them healthy and reduce Varroa Mite problem in hives.
I inspected the colony today and replaced the old bottom board with a screened bottom board that has an opening to add a board for cooler months and winter. As well it's designed to be put in place over a set period of time to count how many mites fall off the bees and this way I'll know if I have a big problem. I'll be adding medicated strips soon to combat the problem but a screen bottom board helps as the mites fall to the ground and don't make it back up into the hive. Needles to say today's inspection got the girls rather stressed out and at one point I decided to put on gloves to take the last super off and replace the bottom board, they were a little pissed, to put it politely. I took out one frame full of honey and moved a few around to see if I can get them to draw it out and make more. I didn't see the Queen today but did see early Larva stage and I thought I saw a couple of eggs, so she's there but hiding.

Screen bottom board.


Removable solid board.

Closing off the bottom.

Painted and a grid helps counting Mites.

The screened inner cover helps with ventilation.

A frame full of honey.
A little agitated to say the least.

Sunday, August 9, 2015

Getting Ready For "The Girls"

This Blog has been a while coming and a lot has happened so I'll try to start from the beginning as we start on our Bee adventure. Last year we talked about getting into beekeeping, we attended a workshop and got a great exposure to beekeeping and we were hooked. Lots of reading and research over the winter and in the spring we ordered our first colony. They call this a Nuc, short for nucleolus of bees as it is just a queen with a few frames and about 15,000 bees to start off. And they'll build up their number over the summer and be strong enough to survive the winter, but I get ahead of myself. 

So before we ordered our Nuc, I decided that since I'm a woodworker I'll make our own hive and such, and with building bee hives for dummies in hand I started. I just had to make sure I maintained one simple rule, keep the "Bee Space" the same. If the spacing is too small they'll close it up with populous and if it's too big they'll build combs in this space and make it hard to move around or when taking out the frames damaging them. Everything went great, the hive body (super) was done, a bottom board, inner cover, outer cover and an entrance reduce were constructed. Now to make the frames to hold the foundation. The foundation in our case are plastic and have a honey coating to make it more appealing for the bees to work on. The foundation has honey comb pattern on it and this is were the bees will draw out the wax for either making a brood chamber, new bees, or for storing honey. with this first super done we were ready for our first Nuc and so we ordered "The Girls" as I call them. As we waited I thought it would be best to have more on hand and I make a couple of more medium supers and one small one. All our super are 8 frame boxes, we could have made them 10 frame but we thought it would be better with 8, it can get heavy when filled with honey.  So we waited for the call to pick them up.

First part of our hive.

A jug to make the frames.

Three supers on the stand.

Add a little color for protection.